
In this tutorial, I’ll talk about how I set up Kafka to provide website analytics and event tracking for a web application. For my use case, I wanted to store and process raw event data in real-time. With Google Analytics, you can’t do that. Enter Kafka.
What is Kafka?
Kafka is a streaming platform that allows applications to produce and consume messages. It is used for building real-time data pipelines and streaming apps. Some use cases of Kafka include:
- Messaging
- Website Activity Tracking
- Aggregating statistics from various providers
- Log aggregation
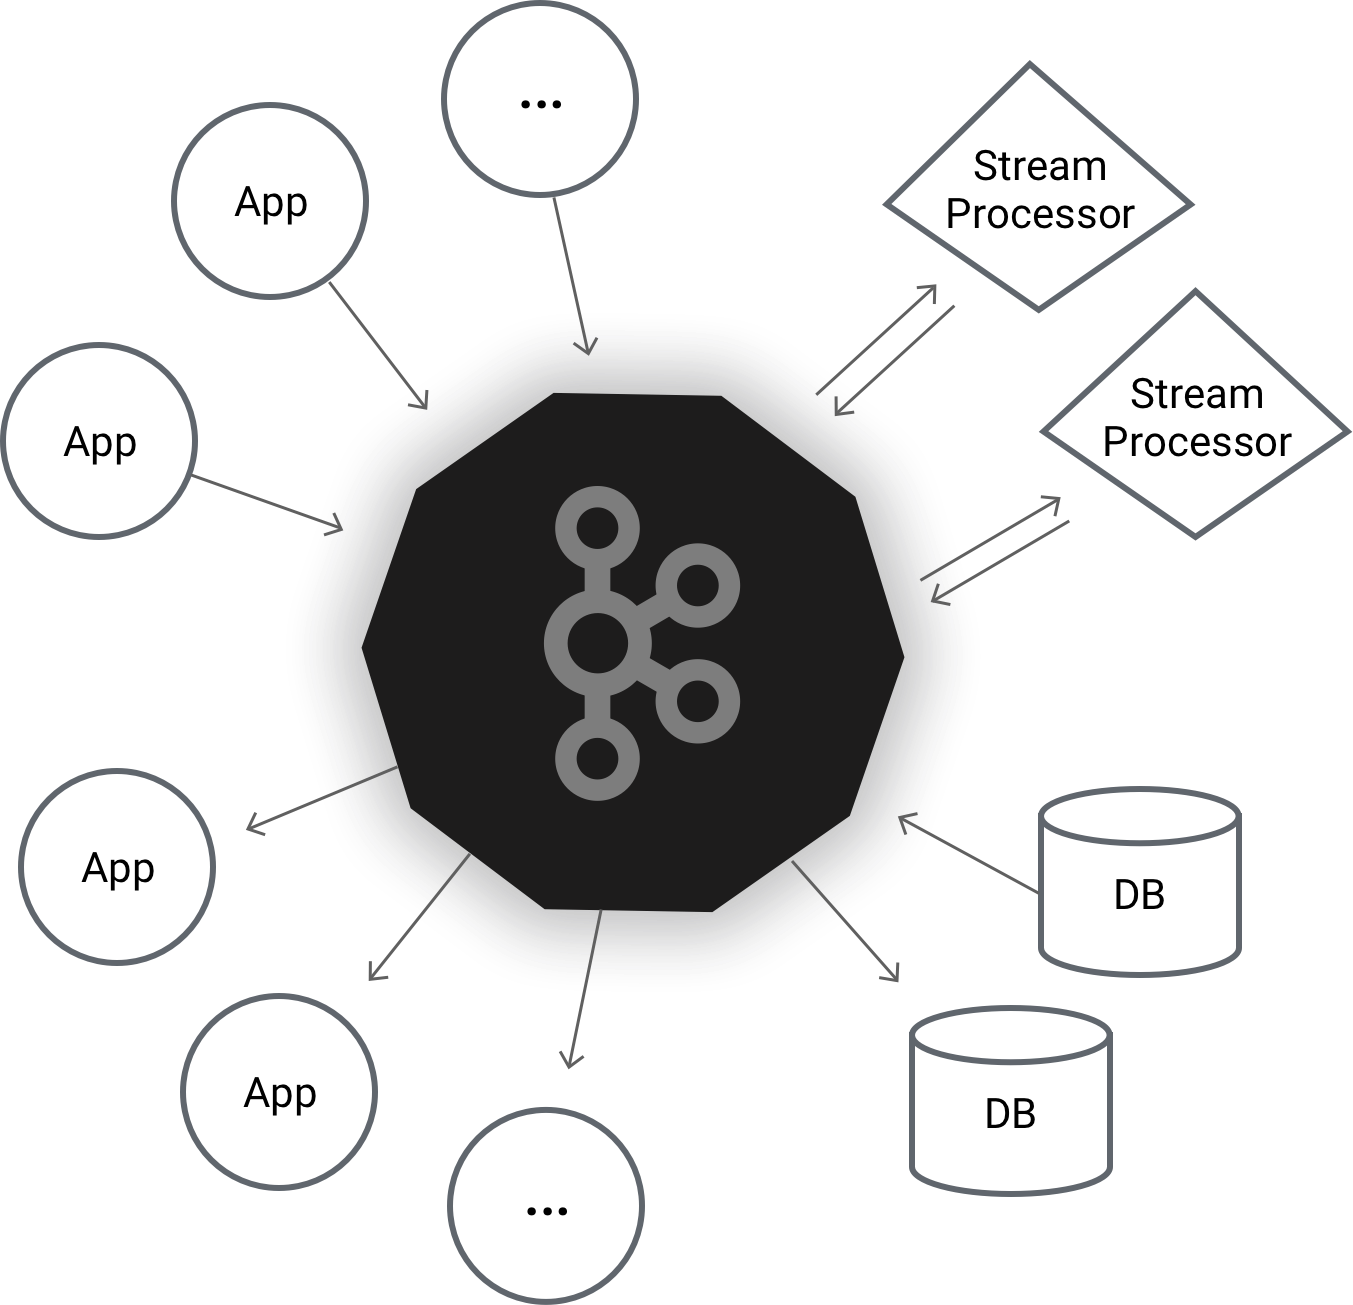
Here’s a high level architecture diagram of how Kafka works:
To understand Kafka, let’s first list some of the basics:
- Applications that send data to Kafka are called producers
- Applications that read data from Kafka are called consumers
- Producers send records. Each record is associated with a topic. A topic is like a category. Each record consists of a key, value, and timestamp.
- Consumers can subscribe to a given topic, and receive a stream of records, and be alerted whenever a new record is sent.
- In the event that a consumer goes down, it is able to restart streaming from where it left off, by keeping track of the topic’s offset.
- Kafka guarantees the order of messages in a given topics, regardless of the number of consumers or producers
Through Kafka’s architecture, we are able to decouple the production of messages from the consumption of them.
Setting up Kafka locally
To setup Kafka locally, we’re just going to be using the Quickstart Guide on the website. Follow steps 1 to 4 on the guide.
First, download Kafka. Then, un-tar it.
tar -xzf /path/to/kafka_2.11-1.0.0.tgz
cd kafka_2.11-1.0.0
Kafka uses ZooKeeper so you need to first start a ZooKeeper server if you don’t already have one. You can use the convenience script packaged with kafka to get a quick-and-dirty single-node ZooKeeper instance.
bin/zookeeper-server-start.sh config/zookeeper.properties
Now start the Kafka server:
bin/kafka-server-start.sh config/server.properties
Let’s create a topic named webevents.dev with a single partition and only one replica:
bin/kafka-topics.sh --create --zookeeper localhost:2181 --replication-factor 1 --partitions 1 --topic webevents.dev
We can now see that topic if we run the list topic command:
bin/kafka-topics.sh --list --zookeeper localhost:2181
webevents.dev
Alternatively, instead of manually creating topics you can also configure your brokers to auto-create topics when a non-existent topic is published to.
Now, Kafka is set up and running on http://localhost:2181.
Writing a Kafka Producer in JavaScript
We can write a Producer in JavaScript using the kafka-node npm module. Depending on your use case, you may choose to have the producer live on it’s own server, or integrate it with your existing web application.
Regardless of what you decide, you can create a service like the one below to encapsulate the logic associated with producing records to Kafka.
import kafka from "kafka-node";
import uuid from "uuid";

const client = new kafka.Client("http://localhost:2181", "my-client-id", {
    sessionTimeout: 300,
    spinDelay: 100,
    retries: 2
});

const producer = new kafka.HighLevelProducer(client);
producer.on("ready", function() {
    console.log("Kafka Producer is connected and ready.");
});

// For this demo we just log producer errors to the console.
producer.on("error", function(error) {
    console.error(error);
});

const KafkaService = {
    sendRecord: ({ type, userId, sessionId, data }, callback = () => {}) => {
        if (!userId) {
            return callback(new Error(A userId must be provided.));
        }

        const event = {
            id: uuid.v4(),
            timestamp: Date.now(),
            userId: userId,
            sessionId: sessionId,
            type: type,
            data: data
        };

        const buffer = new Buffer.from(JSON.stringify(event));

        // Create a new payload
        const record = [
            {
                topic: "webevents.dev",
                messages: buffer,
                attributes: 1 /* Use GZip compression for the payload */
            }
        ];

        //Send record to Kafka and log result/error
        producer.send(record, callback);
    }
};

export default KafkaService;
The code above exports a KafkaService object with a single public method, sendRecord(recordObj, callback). It accepts a record object and an optional callback.
Importantly, all of these records are sent against the topic, webevents.dev. This will tell my consumer (which we will write next) what topic to listen to.
Depending on your use case, the data that you send will change. For my use case, I’m interested in website event tracking so I send some anonymized user data such as userId, sessionId, as well as arbitrary JavaScript data that is stored in data. This is all JSON-stringified and sent to the associated topic.
Check out the Producer API for kafka-node to learn more about what you can do with Producers.
Writing a Kafka Consumer in JavaScript
A Kafka Consumer can also be written with the kafka-node npm module. For my use case, my consumer was a separate Express server which listened to events and stored them in a database.
However, you can do all sorts of interesting things with consumers, such as emailing, logging, performing real-time data analysis and more.
import kafka from "kafka-node"

const client = new kafka.Client("http://localhost:2181");

const topics = [
    {
        topic: "webevents.dev"
    }
];
const options = {
    autoCommit: true,
    fetchMaxWaitMs: 1000,
    fetchMaxBytes: 1024 * 1024,
    encoding: "buffer"
};

const consumer = new kafka.HighLevelConsumer(client, topics, options);

consumer.on("message", function(message) {

    // Read string into a buffer.
    var buf = new Buffer(message.value, "binary");
    var decodedMessage = JSON.parse(buf.toString());

    //Events is a Sequelize Model Object.
    return Events.create({
        id: decodedMessage.id,
        type: decodedMessage.type,
        userId: decodedMessage.userId,
        sessionId: decodedMessage.sessionId,
        data: JSON.stringify(decodedMessage.data),
        createdAt: new Date()
    });
});

consumer.on("error", function(err) {
    console.log("error", err);
});

process.on("SIGINT", function() {
    consumer.close(true, function() {
        process.exit();
    });
});
This consumer just listens to the webevents.dev, and whenever a new record comes in, it stores it in the database. A single consumer can also listen to multiple topics.
Check out the Consumer API for kafka-node to learn more about how consumers work.
Once you write a consumer such as this, you can start it by running:
node kafka-consumer.js
Now that we have all our services running (our Kafka instance, our producer, and our consumer), we can effectively start producing and consuming events.
I hope that helps you get a grasp on how to get started with Kafka and NodeJS. If you have any questions or comments, you can tweet them to me @tilomitra. 👋

Comments are closed.